Embroidery on Paper
Menu
Anne Warburton, Fibre Artist
  • Home
  • Fibre Gallery
    • Fragments
    • Rust & Corrosion Series
    • Lineations Series
    • Lichens
    • Mixed Media, Embroidery
    • Urban Refurbishment
    • Hand Series
    • Haiku & Photography
  • Musings
  • Artist Statement
  • CV
  • Media
  • Home
  • Fibre Gallery
    • Fragments
    • Rust & Corrosion Series
    • Lineations Series
    • Lichens
    • Mixed Media, Embroidery
    • Urban Refurbishment
    • Hand Series
    • Haiku & Photography
  • Musings
  • Artist Statement
  • CV
  • Media

Alphabet Book - W & X

2/23/2014

 
The pressure was on for the letter W. Family members - whose also have a last name that starts with W - indicated they were quite looking forward to seeing this letter.

So here it is. Since it's name begins with the word "double" I decided to double up on "W" techniques. The first technique was to paint the background (fabric) with watercolour pencils. Once it dried, I gelled the fabric onto a stabilizer. The second technique was the embroidery using 2 different stitches (including the Whip stitch) and in 2 different colours. (Click on the image to see a larger size.)

Have I met the expectations?

Next, on to the letter X. I never did find a technique or material to fit this letter, so I went with "texture" since it does at least have the letter X in it.
Three textures are included here: a sand resin (green), moulding paste (blue) and a smooth polymer medium (orange).
Picture
Picture

Week 5 at Ottawa School of Art

2/19/2014

 
Picture
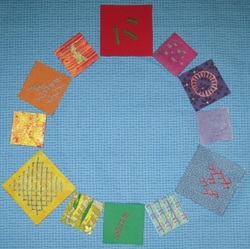
Our task this week and last was to learn 6-7 new stitches and create a drawing out of them.

I chose to make a colour wheel. I had been wanting to make one anyway to use as a teaching tool, but didn't really want the traditional painted wheel or to buy one at an art store. So I decided to make one using coloured backgrounds and various stitch types. The thread colours I chose to use on each colour in the wheel has a specific purpose; e.g. to show complementary colours or secondary colours or analogous and so on.

Rather than 6-7 stitches, I used 12 different stitches (it will actually end up being 14 as I also plan to add neutrals of black and white, which means I have a bit of homework to do to complete the whole project).

The coloured bits shown here are not stitched onto the background. I added felt to the back of each piece, then covered a lightweight board with flannel. The felt stays on the flannel and I can move them around and use only a few or however many I need at a time to teach the colour wheel.

Letters T, U & V

2/16/2014

 
The countdown is on, only 4 letters left.

Letter T - Tissue Paper - a surprisingly versatile medium. 
I started with white paper, added blue acrylic paint and a polymer medium. After it dried, I added a stabilizer to the back using a gel medium to give it more strength so I could then add the embroidery stitches.


Letter U - is for "Upcycled". The definition of upcycling is re-using a material for another purpose (vs. recycling which is about re-using the material for the same purpose).
To make this letter, I gathered up old Christmas cards and tore them into small pieces to make a collage in the U shape, then added a bit of stitching to complete the look.


Finally, Letter V - Van Dyke Stitch.
Originally the letter V was to be velvet embossing. I followed the instructions, tried a second time, but just wasn't happy with the results. So after a bit of research, I stumbled across the Van Dyke embroidery stitch which I had never heard of until this week. I'm quite taken with how it looks and will definitely use it again. This is a great example of being happy about the original plan not working out!
Picture
Picture
Picture

Ottawa School of Art - Week 4

2/12/2014

 
Apparently  over 300 embroidery stitches have been developed and perfected over hundreds of years. In this week's class and next, I'm supposed to be learning 6 or 7 of the 300.

We get to choose which ones - it all depends on the picture we have chosen to do, and how we each choose to represent the textures and objects in our drawings. I think it took longer to go through books to choose stitches than the time that we were stitching.

As this is not a "traditional" embroidery class, we tend towards non-traditional backgrounds in most cases including paper, denim, felt, even leather and canvas. There was some discussion of trying plastic or mylar to see how it would work. As my work in the past has been on paper and since some stitches don't lend themselves well to paper, I am trying out different fabrics and alternatives.

The piece I am working on will end up being a colour wheel, and will be used as a training tool for teaching colour theory in my classes and when teaching stitching on paper. And hopefully it will also make an interesting piece of wall art. To do a full colour wheel plus neutrals, I should end up doing at least 14-15 different stitches. Two done.....
Picture
Van Dyke Stitch - done on jersey which is not easy. I had never even heard of this stitch until yesterday.
Picture
Trellis Stitch - this is do much easier done on cotton. What a difference from jersey!

Letters Q, R and S - only 7 more to go

2/9/2014

 
Q - Quilting -
This is the first time I have tried quilting, and my thanks go to Quilting Arts magazine for instructions.
I did not use batting (the book is getting quite thick after all), but did use a stabilizer which was recommended in the magazine. All the stitching was done by hand, and the felt and letter appliqued on.

Having now finished this piece, there may be more art quilts in my future!
Picture
R is for ribbons.
I used a variety of colours on the letter to create this collage of ribbon work, using couching to attach the ribbons. I am quite pleased with the result. I have seen large pieces using similar techniques and have loved the effect. Perhaps a large scale ribbon piece will also be in my future.
Picture
S - Stamping on Fabric
I watched this technique done in India using vibrant colours and creating beautiful fabrics.
Here I used a hand stamp with 2 colours of acrylic paint. Looks like it was made that way I think.
Picture
The Alphabet Book will be on display at the Fibre Fling Show & Sale - details below. Click to enlarge the poster.

http://www.out-of-the-box.org/
Picture

Letters N, O & P of the Alphabet Book Project

2/2/2014


N is for needleweaving. I wrapped strips of ribbon around a piece of cardboard, then did the weaving with a needle & thread to create the letter. Once done I cut the weaving off the cardboard and adhered it to a background.
Picture
Picture
  
O is for oil stix. I used this oil paint over some textured plates to create the coloured effects on the green and the peach coloured fabrics. I then cut out the O and used fabric glue to attach it. This will be a good project to try again to get some interesting backgrounds.

P is for paste papers. This letter P includes 6 different papers, with varying colours and textures. Some I made with a wheat paste and others with cornstarch paste. I definitely prefer the wheat paste and one day will try to make it with a gluten-free flour.
Picture
Follow on Bloglovin
    Awakening the heart 
    with art
      
    Artist - Anne Warburton
    Picture
    Follow my blog with Bloglovin
       
    Subscribe
    & add this blog to your RSS Reader with this link:

    RSS Feed

     
    Or email me:
    annewarburton@hotmail.com
     

    Categories

    All
    Alphabet Book Project
    Art Links
    Art Projects
    Art Projects
    Colours
    Community Art Mural
    Creativity & Inspiration
    Creativity & Inspiration
    Creativity & Inspiration
    Miscellaneous
    School Of Art


    Bookmark and Share
    Bookmark and Share
    Follow Me on Pinterest
    View my profile on LinkedIn

    Picture
    2 Bags Full
    Picture
    Celtic Thistle Stitches
    Picture

    About Me

    It's taken years to discover the medium I enjoy the most. And how what I have learned before somehow fits into what I am doing now. Even when I travel my needles and threads are with me so I can continue to create while away.

    It's been wonderful being able to share my work with others and to be a part of an artistic network that continues to grow and develop.

    If you have ideas you would like to suggest, please let me know. And check back regularly to my web site for updates.


    Archives

    June 2016
    May 2016
    February 2016
    January 2016
    February 2015
    January 2015
    June 2014
    May 2014
    April 2014
    March 2014
    February 2014
    January 2014
    December 2013
    November 2013
    October 2013
    August 2013
    June 2013
    March 2013
    February 2013
    January 2013
    December 2012
    November 2012
    October 2012
    August 2012
    July 2012
    June 2012
    May 2012
    March 2012
    February 2012
    January 2012
    December 2011
    August 2011
    July 2011
    May 2011
    April 2011


Powered by Create your own unique website with customizable templates.
Embroidery on Paper Embroidery on Paper designs by Anne Warburton