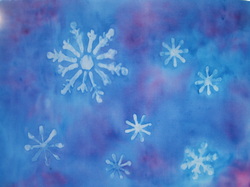
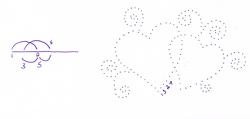
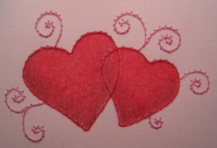
 Some of my students made these recently - they really enjoyed using the watercolour pencils on fabric. This art piece looks great in a window. The resist areas really show up well. Polyester fabric seems to work best – use white unless a different background colour is desired. Cut fabric to the size you want. I recommend using Fray Check or other product around the edges of the fabric to prevent stray threads; let dry; or make small seams with a serger. Tape down fabric onto wax paper, shiny side up. Choose a variety of snowflake stencils and sizes. Please first snowflake stencil on fabric. Using Elmer’s Washable School No Run Gel glue, spread glue with tip or with sponge brush or cosmetic sponge. Lift carefully from fabric, and place next stencil then repeat. The glue will act as a resist. Wash stencils when done and before glue dries. Wash sponges. Let fabric dry at least 12 hours. Mix 1 part fabric medium to 2 parts water in small jar. Brush fabric medium on fabric to wet it – works small parts at a time. I used watercolour pencils for this painting. Choose a background olour and a second colour to add some contrast. Begin to lay down the background colour one section at a time, adding a bit of the second colour for contrast or highlight. The pencils do not need to be sharp, but should not be too dull either. It works best to dip the tip of the pencil into the fabric medium/water mixture. Begin to mix colours together before the fabric dries. If it dries add more water. Use a wet cosmetic sponge and gently make circles to blend the colours together and to remove any blotches of colour that you do not want. Do not press too hard. If they colours do not blend well, leave for a few minutes then go back to it again. This will give the water time to “melt” the pencil. Once done, let your drawing dry. Remove painters tape. Hang in a window to let the light shine through the snowflakes. Supplies · Thread (2 colours) - I prefer Gütermann brand thread, but any good quality thread will do. Metallic is an option too. · Sewing needles – small enough so you don’t leave large holes in your paper · Needle or punch – should be either the same size or slightly larger than your sewing needle · Punch mat - the back of a mouse pad works very wel · Scotch tape · 2-sided tape or glue stick - I prefer the 2-sided tape or glue stick. Liquid glue works fine on cardstock, but may cause wrinkles on thinner papers · Scissors, for cutting thread · Cardstock (2 colours: 1 colour to embroider on (I used white for this project), and a second colour to use as a mat (I used a metallic red paper) · Ruler and cutting knife or trimmer , for cutting the cardstock · Tracing paper and pen or pencil · Blank card and envelope, approx. 5 x 6-1/2”  Technique PDF of pattern Open the design on your computer, re-size as needed, print out, then trace onto tracing paper. Be as accurate as possible when placing the dots. Cut your main piece of card stock to a size that the pattern will fit on nicely. Centre the traced design on the cardstock. Hold down securely and, using a needle or punching tool, carefully punch the design on your cardstock. Hold the card and tracing paper up to the light to ensure you have punched all the holes. When done, remove the tracing paper. Follow the numbers, starting at 1, on each part of the design. For the hearts, I recommend doing one half, then starting anew on the other half. Pull the needle through the cardstock from the back and tape down an end about ¼” to ½” in length. Try not to place the tape over any of the punch holes. Taping, rather than making knots, is done so that no bumps can be seen or felt through the paper. Continue to follow the numbers, as each section is completed, tape down the end of the thread and cut before moving on to the next section. Continue until each part of the design is complete. Finishing
To hide the back of the work, use your second piece of cardstock. Cut slightly larger than your embroidered piece, so it looks like a mat, and paste, or use the 2-sided tape to attach. When dry, paste onto a blank greeting card. Embellish with coloured pencil, jewels or other trim. © 2012 Note: This piece may be reproduced for personal use only, and may not be reproduced for sale. I recently had a thumb injury which has not prevented me from painting or working with a needle & thread, but it sure was annoying and a bit sore. I'm glad to say it is healing, although very slowly and it's still very tender. It got me thinking about injuries that artists - and anyone who does any kind of repetitive work especially - can and do get. Some are easy to fix, others never really heal and keep flaring up, and other are, well, continually problematic.
Injuries may not be a very exciting topic, but is one that I thought was worth addressing. Because artists, painters, and anyone creative can be at risk for injury. We do need to know how to properly use brushes and pencils in order to minimize potential problems. We need to ensure lighting in our studios is good. Neck and shoulder issues are quite common. Are we leaning over too much, are we straining our necks, our eyes or other muscles? Repetitive strain injuries are all too common, affecting the wrist and shoulder, even fingers and thumbs. Help can be obtained from your doctor, and through massage or physio therapies. But it's best to prevent these injuries from happening in the first place since, as I mentioned above, some take longer than others to heal. None of us wants to give up our creative ventures! I recently came across a web site on an "Artist Injury Prevention Program" http://www.selfcare4rsi.com/artist.html. The site includes descriptions of the various problems that can crop up. They aren't restricted to just artists, but to writers, golfers, sports enthusiasts and so on. The web site talks about the importance of stretching and includes examples of stretches. Now the information provided of course does not take the place of your health care provider, but maybe if we are all a bit more aware of these potential issues and are in touch with how our bodies feel, we can prevent some of these injuries from happening in the first place. I have a good stretch program that I follow 3-4 times per week, partly as a result of a wrist problem, but also to prevent problems in other areas. I hope you find this link as useful as I do. Do you find it hard to get started doing art or other creative endeavour, or even getting started on a large project? Do you find everything else to do, except getting started? Even cleaning the house seems to come first and even though being creative is so important to us.
And this is doubly important to me to get going more on art - one of my New Year's resolutions. When it comes to getting into the creative spirit, some would have us believe that all we have to do some doodling - that is supposed to get the right brain stimulated enough to get us started. If you're like me, that doesn't work. Okay, here are some ideas that I find really do work - perhaps not every single time, but they do work more often than not: - Schedule time to do your art with another person, then you are motivated to get started, and not to find other stuff to do instead - Play background music - music facilitates creativity and can help you hold your attention on a project longer than if there is no background music. (for a bit more info see my blog from last month) - The kind of music you listen to while creating matters. Hard rock or metal may provide too much excitement, while impressionistic can help with free-flowing ideas, and classical will benefit special perception. Country music will stir up memories and emotions, chants or drumming will lower your pulse and help provide a calm environment. - Go for a walk or a drive. The visual stimulation helps kickstart the creative ideas. I used to find my drive home from my office was the best time for processing issues and finding solutions. And if you listen to music at the same time, you will notice even more benefits. - Sing or hum - Singing and humming uses both sides of the brain at the same time. - Move, dance, drum, conduct .....try one of these and see how you feel. Hope I've given you some inspiration here. Really, the cleaning will still be there tomorrow, so try one of these ideas to get started on that project. |
Artist - Anne Warburton
About MeIt's taken years to discover the medium I enjoy the most. And how what I have learned before somehow fits into what I am doing now. Even when I travel my needles and threads are with me so I can continue to create while away. Archives
June 2016
|


