|
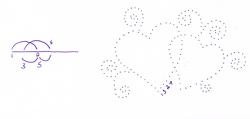
Supplies · Thread (2 colours) - I prefer Gütermann brand thread, but any good quality thread will do. Metallic is an option too. · Sewing needles – small enough so you don’t leave large holes in your paper · Needle or punch – should be either the same size or slightly larger than your sewing needle · Punch mat - the back of a mouse pad works very wel · Scotch tape · 2-sided tape or glue stick - I prefer the 2-sided tape or glue stick. Liquid glue works fine on cardstock, but may cause wrinkles on thinner papers · Scissors, for cutting thread · Cardstock (2 colours: 1 colour to embroider on (I used white for this project), and a second colour to use as a mat (I used a metallic red paper) · Ruler and cutting knife or trimmer , for cutting the cardstock · Tracing paper and pen or pencil · Blank card and envelope, approx. 5 x 6-1/2”  Technique PDF of pattern Open the design on your computer, re-size as needed, print out, then trace onto tracing paper. Be as accurate as possible when placing the dots. Cut your main piece of card stock to a size that the pattern will fit on nicely. Centre the traced design on the cardstock. Hold down securely and, using a needle or punching tool, carefully punch the design on your cardstock. Hold the card and tracing paper up to the light to ensure you have punched all the holes. When done, remove the tracing paper. Follow the numbers, starting at 1, on each part of the design. For the hearts, I recommend doing one half, then starting anew on the other half. Pull the needle through the cardstock from the back and tape down an end about ¼” to ½” in length. Try not to place the tape over any of the punch holes. Taping, rather than making knots, is done so that no bumps can be seen or felt through the paper. Continue to follow the numbers, as each section is completed, tape down the end of the thread and cut before moving on to the next section. Continue until each part of the design is complete. Finishing
To hide the back of the work, use your second piece of cardstock. Cut slightly larger than your embroidered piece, so it looks like a mat, and paste, or use the 2-sided tape to attach. When dry, paste onto a blank greeting card. Embellish with coloured pencil, jewels or other trim. © 2012 Note: This piece may be reproduced for personal use only, and may not be reproduced for sale. |
Artist - Anne Warburton
About MeIt's taken years to discover the medium I enjoy the most. And how what I have learned before somehow fits into what I am doing now. Even when I travel my needles and threads are with me so I can continue to create while away. Archives
June 2016
|


